When you press a few keys on your Mac and instantly capture screen on Mac, you save time, reduce confusion, and create a clear image of what you want to show. According to Apple’s support documentation, you can capture the entire screen, a portion of it, or just a window with built‑in tools. If you have ever felt fumbling with PrintScreen on other systems or hunted for the right menu item, here is a clear guide for macOS. Knowing how to take snapshot on Mac really means you work smarter when you need to share, save, or document what you see. With the right Mac keyboard shortcuts and tools like the Screenshot app Mac, taking screenshots becomes seamless.
What “snapshot” means on a Mac
In this context “snapshot” simply means a Mac screenshot, an image of your screen at a specific moment. On Mac computers you do not need a third‑party app for most tasks. The operating system includes Mac keyboard shortcuts and a dedicated Screenshot app Mac (on newer systems) that make the process straightforward. The notion may sound technical but in practice it is easy: press a key combination, the Mac captures what is visible, saves a file or clipboard image, and you can annotate or share it.
Knowing the options matters because your workflow might require the full screen, just a part of it, or a single window. Picking the right method means fewer steps and less editing later. These tips will help you understand how to capture full screen on Mac, how to take partial screenshot on Mac, and how to capture a window on Mac.
Capture the entire screen
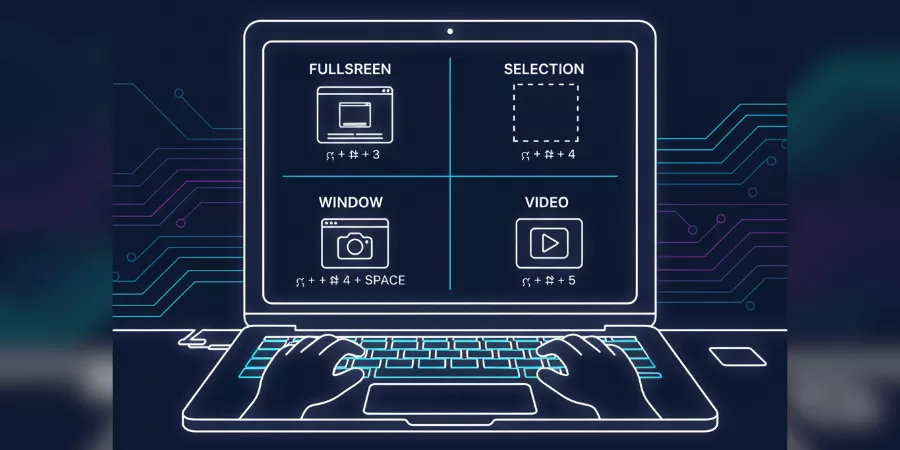
To grab everything on screen, arrange what you want visible (dock, menus, windows) and then press Shift + Command + 3 together. You will hear the shutter sound (if enabled), and the Mac screenshot will appear by default as a PNG file on your desktop with a name such as “Screen Shot [date] at [time].png.” If a thumbnail appears in the corner, you can click it to edit immediately, or let the file save automatically. That simple step covers full screen capture and shows how to capture full screen on Mac.
What this really means: if you want to capture a messy desktop, a full browser window and sidebars, or simply record what you see without worrying about exact framing, this is the method.
Capture a portion of the screen
To grab just a part of the screen, press Shift + Command + 4 together. The cursor will change into a crosshair. Click and drag to select the area you wish to capture. Release the mouse or trackpad button to take the snapshot. If you decide you changed your mind, press the Escape key before releasing to cancel that capture.
This method is useful when you want just one part of a window, specific content, or you do not want the full screen image. For instance, you might want to grab just a chart, a chat window, or a region of your desktop rather than everything. The ability to frame precisely saves editing later and is key to how to take partial screenshot on Mac.
There are extra shortcuts too: once you start dragging a selection you can hold the Space bar to move the selected area without changing its size, or hold Shift to adjust one side only.
Capture a window or menu
To capture a specific window or menu, press Shift + Command + 4, then press the Space bar. The cursor will become a camera icon. Hover the camera over the window you want, and click. If you hold the Option key while clicking, you exclude the window’s drop shadow for a cleaner image. This shows how to capture a window on Mac effectively.
This method is handy when you want to isolate one application window, menu, or pop‑up without including the rest of your screen. Imagine you want to show a particular dialog box or form rather than everything else around it.
Using the Screenshot app (macOS Mojave and later)
On Macs running macOS Mojave (10.14) or newer you can press Shift + Command + 5 to open the Screenshot app Mac toolbar. The toolbar gives you icons for full screen capture, window capture, selected portion capture, and even screen recording. In the Options menu you can set a timer, choose where screenshots save on Mac, include or exclude the pointer, and turn floating thumbnails on or off.
If you prefer visual controls instead of memorising Mac keyboard shortcuts, this is a great approach. It also offers more flexibility for where your thumbnail appears and how the file is managed.
What this means in practice: instead of instantly capturing when you press a shortcut, you see a toolbar, choose a mode, then capture. Slightly more steps, but more control.
Where your snapshots go and how to change the save location
By default, Mac screenshots save to the desktop. If your desktop becomes cluttered or you cannot find your image, you can change the save location via the Screenshot app Mac (Shift + Command + 5) and choosing Options → Save To. Knowing where screenshots save on Mac ensures you can quickly access your images.
If your screenshot seems “missing”, it may have gone to a different folder, or the floating thumbnail appeared and you dismissed it without noticing. The Finder search function works well: open Finder, type “screenshot” in the search bar and narrow by Kind = Image. The practical takeaway: make sure you know where your image is going. If you share multiple screenshots with others, setting a folder like “Screenshots” or “Workspace Snaps” can keep things organised.
Practical tips and common issues
- Tip one: if your Mac keyboard shortcutsdo not work, check System Settings → Keyboard → Shortcuts → Screenshots. Sometimes keys conflict or get disabled.
- Tip two: to copy a Mac screenshotto the clipboard instead of saving a file, hold the Control key in addition to the other keys (for example, Control + Shift + Command + 3) and then paste where needed.
- Tip three: avoid using your phone camera to take a picture of the screen. The built‑in screenshot method provides clean resolution and file naming.
If you face weird behaviour such as no sound, no file saved, or the shortcut not working, restart the Mac, check keyboard functionality, and explore whether a third‑party app or utility has remapped the keys. Analogy: think of taking a snapshot like taking a photo of your workspace rather than writing down every detail. It removes description, shows reality, and communicates exactly what you see. With a Mac, once you know the shot options you click less, think less, and share more. Here are some extra Mac screenshot tips and tricks to improve efficiency.
Conclusion
Here is what to carry forward: Snapshot tools on Mac are built in, reliable, and simple once you know them. Whether you capture screen on Mac, a selected portion, or a single window, you have the right commands. Use Shift + Command + 3 for full screen, Shift + Command + 4 for selection, and Shift + Command + 4 plus Space for a window. If you prefer visual options and extra controls use Shift + Command + 5 to open the Screenshot app Mac.
Make sure you know where screenshots save on Mac. Organise your workflow so that when you need to show something, you capture screen on Mac confidently and send it with clarity. Your next step: pick one of these Mac keyboard shortcuts, test it now, and save your first Mac screenshot while learning how to take snapshot on Mac. Remember these Mac screenshot tips and tricks for smoother daily use and efficiency in sharing or documenting your work.
Knowing how to take snapshot on Mac will make your workflow seamless, whether you capture screen on Mac, take partial captures, or how to take partial screenshot on Mac for precise areas. Mastering these commands explains how to take snapshot on Mac, how to capture full screen on Mac, and how to capture a window on Mac.